Culturing The Cream
Cultured butter starts with cultured cream. The “culturing” results from leaving raw cream at left at room temperature to spontaneously sour as its own beneficial bacteria proliferate OR it results from the (raw or pasteurized) cream being innoculated with a culture. I’ve done it both ways — and both are delicious!
The spontaneous culturing can happen in an little as 24 hours at room temperature in a jar covered with a cloth. You can also then move the cream to cool storage to let the culturing mature, for several weeks even. Note: This does not work for pasteurized cream; there are not sufficient beneficial organisms to proliferate.
To innoculate cream, use about 1/8 teaspoon of a mesophilic culture per 1/2 gallon of cream. Stir in the culture, cover the jar with a cloth, and leave at room temperature for 24 hours. Then transfer to the refrigerator to chill, or to continue souring.
On Facebook, Julie from Cultures for Health added: “There are a couple of easy ways to culture cream. You can use a Buttermilk or Piima Yogurt as a starter culture (a tablespoon or two per pint of cream) or you can use a bit of mesophilic cheese culture like Wardee has done here.” Thanks, Julie! And Anne mentioned that kefir grains can be used to culture cream as well. Thanks, Anne!
The cream, no matter how it is cultured, must be chilled to make the butter. Or at least for the butter to appear any time soon.
What About The Taste?
Well, some do not like the taste of cultured butter so much. One person in my family likes sweet cream butter better. To each his own — but give me sweet and sour, deeper flavor butter any day!  I suggest you try it and see whatyou think. No matter what, give yourself time to adjust to it. You will. I think you’ll learn to like it, if not love it.
I suggest you try it and see whatyou think. No matter what, give yourself time to adjust to it. You will. I think you’ll learn to like it, if not love it.In Pictures: Making Cultured Butter
This article at Mother Earth News is a great place to start for instructions. The following picture tutorial is based off those directions.
In the case of the butter below, I received a 1/2 gallon of cream which was already somewhat cultured. I let it sour more in the refrigerator for about 8 days until it was … perfect! Mmm… I can still taste it.
Take your chilled cultured cream and pour it into a mixer, food processor, or blender. Don’t use a Vita-Mix or the mixture will heat up. Whatever your container is, fill it it to less than half because the cream will expand during the churning. (Think whipped cream.)
I used a food processor with an 8-cup capacity. I added 3 cups of cultured cream at at time and process in batches until my quantity of cultured cream is turned into butter solids.
Pour the cream into the food processor bowl with the regular blade. Put on the lid and turn on. The process of churning may take between 5 and 10 minutes. The cream will go through stages on its way to butter. First, it will expand its volume and become whipped cream.

Then the butter solids will start to clump together and separate from the liquid (buttermilk). The whole mixture will appear grainy.

Then the solids will clump together even more until you have big chunks of butter floating in buttermilk. Churn just a minute or so more to complete the process of clumping the butter solids.
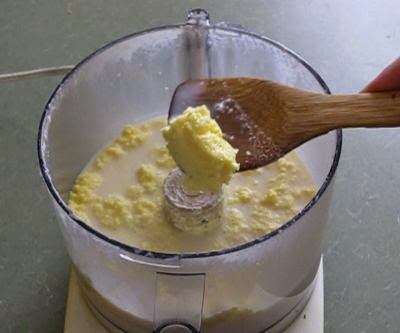
Transfer the butter solids to a bowl. The liquid is buttermilk and can be used in baking, smoothies, for soaking grains, you name it.
Repeat the churning process with all the cream until it is all collected in the bowl.

Now it is time to wash the butter. Add cold, clean water to the bowl and use a hard spoon, such as this bamboo spatula, to press and fold the butter into the sides of the bowl. The water will quickly turn clowdy as the remaining buttermilk releases from the butter solids.

Change the water repeatedly. Keep washing the butter until the water stays clear. When the water is clear, you have clean butter! The cleaner the butter, the longer it will last. The washing water isn’t true buttermilk as it is too watered down. It makes good water for animals or the compost.
Pour off the remaining water. Press and fold the butter a few more times to release any trapped water. Mix in sea salt, to taste. Then transfer the butter to some kind of mold, or you can just shape it into a log or chunks. I happen to have a butter mold, but only because it was given to me.

Scrape off the mold.

Release the butter from the mold onto a sheet of natural wax paper.


This is a little bit of extra butter that didn’t fit the mold the first time.

Wrap up gently — the butter is still soft. I used natural wax paper for the wrapping. Transfer to the refrigerator to harden fully. Then wrap it more securely for refrigerator storage. It should keep for a couple weeks in the refrigerator, and perhaps more if washed well. Mine never lasts long enough to test how long it would last!
I hope you’ll give cultured butter a try. It is especially healthful when the cream comes from animals feasting on rapidly growing green grass. That butter is rich in fat-soluble vitamins.
source: http://traditionalcookingschool.com/2010/07/07/cultured-butter/?utm_content=buffere2892&utm_medium=social&utm_source=facebook.com&utm_campaign=buffer
Niciun comentariu:
Trimiteți un comentariu