HOW TO MAKE A GLUTEN-FREE SOURDOUGH STARTER
You know there’s a great love for sourdough when people all across the real food arena unite in asking the same question: can you make a gluten-free sourdough starter?
One in five Americans eat gluten-free for various reasons so the question isn’t surprising. So, in an attempt to answer this question, there’s been another “growth” in my kitchen for the past 10 days. I’m trying yet again to capture wild yeast from thin air.
It’s been kinda stinky this time though… a bit like rotten eggs.
And it looks a lot like cream of wheat… you know, the breakfast cereal? But thinner (and smellier). It definitely doesn’t look the “soupy flour” mixture from the ordinary sourdough starter.
In fact, just about everything was different about this gluten-free sourdough starter. Everything except three things:
- It only required flour and water.
- Even with an extra feeding, it wasn’t much work.
- It was a success!
So to answer the question, “Can you make a gluten-free sourdough starter?”
Why yes, my dear sweet gluten-free friends, you can!
HOW TO MAKE A GLUTEN-FREE SOURDOUGH STARTER
Be sure to read the entire tutorial and additional recipe tips through before starting your sourdough.
INGREDIENTS
1/2 cup brown rice flour
1/2 cup cold (or room temperature) filtered water
4 cups brown rice flour
large bowl (approx gallon-size) with lid
1/2 cup cold (or room temperature) filtered water
4 cups brown rice flour
large bowl (approx gallon-size) with lid
METHOD: THE INITIAL STARTER
In a medium to large bowl, combine 1/2 cup of flour with 1/2 cup of water and stir until all the lumps are gone. The mixture will be very thin and soupy. Lightly cover the bowl with a lid, leaving it cracked so that air can flow freely. If bugs and insects are an issue, you may cover the bowl with cheesecloth and secure it with a rubber band.
Place the bowl in a warm area where it can sit undisturbed. This could be outside on a patio, on a kitchen counter or in a pantry cabinet.
Every day, for the next seven days, feed the starter three times a day at approximately the same time. For best results, try to feed the starter at even intervals. For example, 6am (or when you first wake up), 2pm (just before nap time) and 10pm (right before going to bed).
At each feeding, feed the starter 1/2 cup of flour with enough water to mix thoroughly, usually 1/4 to 1/2 cup, for a total of 3/4 to 1 1/2 cups of flour each day. At each feeding, stir well, re-cover and allow it to sit.
The starter may or may not go through a bubbly stage and if it does, it may not be very noticeable. The starter may smell foul around days 2-4, very much like rotten eggs. The smell is not an indication of contamination, rather the natural smell of wild yeast combining with brown rice flour. The smell should subside and become pleasant by day 6-7.
The starter will go through a bubbly and frothy stage and eventually subside. The starter will smell like yeast and/or wine, but the smell should always be pleasant. If the starter ever smells sour or rancid, it has been contaminated and should be thrown away.
A VISUAL OF THE PROCESS
Day 1
This is what the starter looks like when it’s first mixed together.
This is also what it looked like after one full day of feeding. No noticeable changes.
This is what the starter looks like when it’s first mixed together.
This is also what it looked like after one full day of feeding. No noticeable changes.
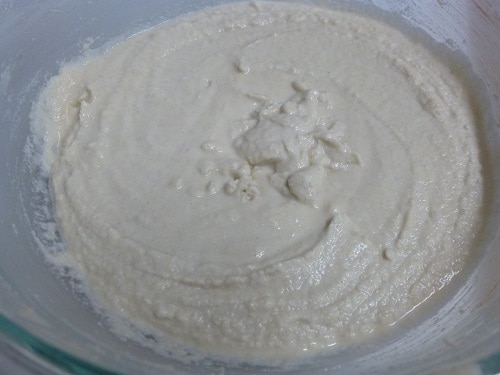
Day 2
We have wild yeast!
There are some large bubbles, some small bubbles visible through the side of the bowl.
The surface will look like cracked clay.
There may or may not have visible bubbles on the surface of the starter.
We have wild yeast!
There are some large bubbles, some small bubbles visible through the side of the bowl.
The surface will look like cracked clay.
There may or may not have visible bubbles on the surface of the starter.
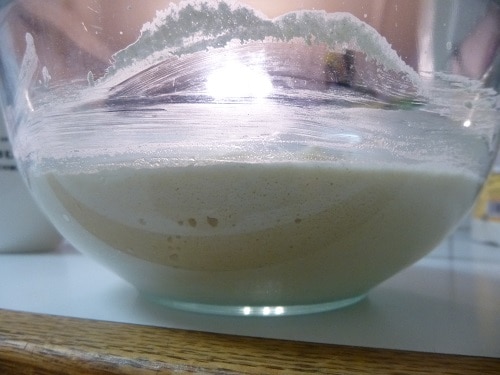
Day 3
Good news! The yeast is multiplying at an exponential rate.
There are more of the larger bubbles and even more of the smaller bubbles.
Again, the surface will look like cracked clay and there may or may not have visible bubbles on the surface of the starter.
You will notice that as you stir, the starter will lack the stringy, spongey feel that traditional sourdough has. This is normal. The starter may begin to have an odor. Keep feeding as directed.
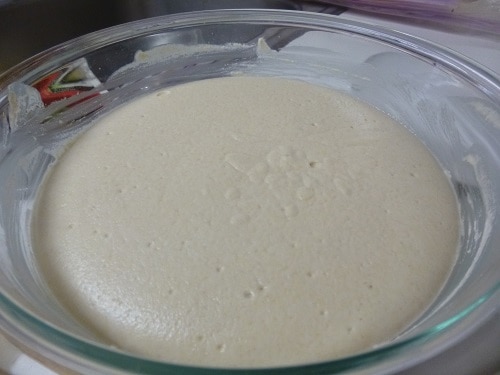
Days 4-7
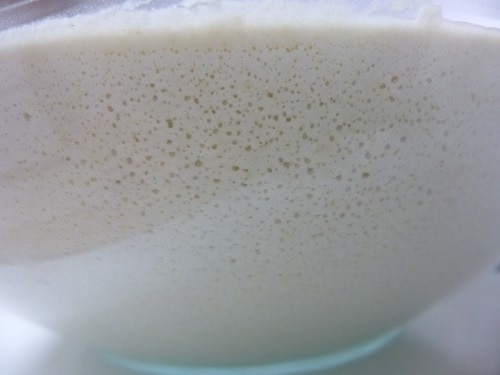
The bubbles begin to become equal in size and evenly distributed throughout the starter. Odors should subside and the starter should smell like sweet yeast by day 7.
Approximately 2-3 hours after feeding, the starter should reach its peak and create a dome on top.
The bubbles begin to become equal in size and evenly distributed throughout the starter. Odors should subside and the starter should smell like sweet yeast by day 7.
Approximately 2-3 hours after feeding, the starter should reach its peak and create a dome on top.
METHOD: FEEDING YOUR ANIMAL
Once the starter is officially created, it enters maintenance mode. The frequency of feedings is determined by how much starter you need and how often you plan to use it.
- At a minimum, the starter can be kept in the refrigerator and fed once a week merely to sustain life of the captured wild yeast.
- You can continue to feed it daily as you have been, and in another seven days there will be enough starter for another batch of bread.
- You can also feed starter as little as one tablespoon of flour and water for every two cups of starter – enough to continue daily growth but not produce a large quantity of starter. (One quart of starter would be fed with two tablespoons).
However frequent or infrequent you decide to feed your starter, the yeast thrives best when it’s fed regularly and consistently. Choose your time frame and quantity and stick with it as best as you can.
METHOD: PREPPING THE FRIDGE STARTER FOR BAKING
Yeast grows incredibly slow at refrigeration temperatures, which is why you can get away with feeding it only once a week. In order for the yeast to successfully leaven a batch of bread, it must be “revived” so to say. The steps are below; along with an example to help you better understand the time frame involved.
- Three and a half days before you plan to bake bread, remove the starter from the fridge and allow to come to room temperature. (Monday night)
- Once the starter is at room temperature, feed with equal parts flour and water. (Tuesday morning)
- Feed the starter two more times that day, around lunch and again before bed. (Wednesday)
- On the morning of day three, feed the starter again. If the starter domes after 2-3 hours, you are ready to bake bread. If the starter does not dome, continue feeding three times daily until there is foam and liquid. (Thursday morning)
METHOD: FLOUR OPTIONS
In my opinion, the best flour for gluten-free sourdough is brown rice flour because it is a whole grain. You may use white rice flour, but brown rice will contain more nutrients. Other options include gluten-free flours and commercial gluten-free flour blends (like this one).
ADDITIONAL RECIPE TIPS
- One 22oz package of brown rice flour is the exact amount needed for this recipe. If you want to continue to feed your starter brown rice flour after the first seven days, wish to have a greater quantity of starter after the first seven days or want to use brown rice flour to bake with your starter you will need at least two bags of flour. Doubling the measurements will yield approximately 3 quarts of starter. One package of flour was $3.79 at my local grocery store. Buying brown rice flour in bulk from Amazon costs as little as $2.55 per package.
- Excess liquid did not collect at the surface of this gluten-free starter. If your does, you can pour it down the drain or stir it into the starter.
- If your starter outgrows your bowl, you may split it between two bowls. Continue the feeding process, dividing the flour and water between the bowls (1/4 cup of each, for each bowl).
- If you are culturing other items simultaneously, be sure to leave at least 3-5 feet of space between each item so the yeasts do not cross-contaminate. (Sourdough won’t make your kefir “bad,” but overtime both cultures can weaken. Best just to keep them apart.)
- Always allow a bit of room for expansion by pouring out some starter and leave approximately 1/2 cup of starter to feed. This ensures you have enough yeast to continue fermenting at the same pace you have been. We made sure to test this starter in sourdough pancakes, and they were good!
- With the time involved in “reviving” refrigerated sourdough, it’s often easier to keep the starter at room temperature and reduce the feedings to only a tablespoon or two daily.
GLUTEN-FREE SOURDOUGH BREAD RECIPES
If you are using a gluten-free flour mix, you should be able to adapt any sourdough bread recipe to be gluten-free. But in case you want to try a gluten-free specific recipe, here are a few that are great:
- Gluten-Free Brown Rice Sourdough
- Artisan Style Sourdough
- Sourdough Bread Boule
- Another Basic Gluten-Free Sourdough Loaf
- Rustic Gluten-Free Sourdough
- Sandwich Bread
- Find many more recipes in Sourdough A to Z
Wondering if you can throw in leftover dough scraps? That’s the easiest way to not waste food, but it doesn’t come highly recommended. Dough tends to have other ingredients too, like salt, eggs, butter, etc. and that wouldn’t be a good environment for your starter. Instead freeze your dough scraps and when you have enough, fry them up and coat them in cinnamon sugar for a homemade version of donuts.
Need some recipes to use up excess starter? These pancakes are our favorite go-to when our starter overfloweth.
Niciun comentariu:
Trimiteți un comentariu